-
Introduction
- Step 1 - Installing WireGuard On Your Debian 11 Server
- Step 2 - Generating Private/Public Key Pair
- Step 3 - Defining the IPv4 Range
- Step 4 - Setting Up The WireGuard Server Configuration
- Step 5 - Modifying The Network Configuration Of The WireGuard Server
- Step 6 - Setting Up The Firewall For The WireGuard Server
- Step 7 - Installing a DNS Resolver on WireGuard Server
- Step 8 - Launching The WireGuard Server
- Step 9 - Setting Up A WireGuard Peer's Configuration
- Step 10 - Adding Peers to WireGuard Server Configuration
- Step 11 - Starting the WireGuard Tunnel on the Peer
- Troubleshooting Instructions
- Conclusion
WireGuard VPN Characteristics
Prerequisites
# Introduction
Online privacy and security are increasingly important in today’s world, where cyber threats and data breaches are on the rise. Virtual private networks (VPNs) are a popular solution for protecting internet connections and safeguarding sensitive data. WireGuard, a new VPN protocol, offers a faster and more secure VPN option for Linux users. If you’re looking to set up a WireGuard VPN server on a Linux machine, this guide is for you. In this blog post, we’ll walk you through the steps to get started with WireGuard, including installing the software, generating key pairs, creating a configuration file, starting the VPN server, and configuring your firewall on a Debian 11 system. Follow these simple steps to enhance your online security and privacy with WireGuard.# WireGuard VPN Characteristics:
-
- Simplicity – WireGuard has been designed to be a simpler VPN solution than other protocols, with fewer lines of code and a streamlined configuration process.
- Speed – WireGuard is known for its speed and performance, thanks to its minimal cryptographic overhead and efficient design.
- Security – WireGuard offers robust encryption and authentication, using the most advanced cryptography available.
- Cross-platform compatibility – WireGuard can run on various operating systems, including Linux, Windows, macOS, Android, and iOS.
- Flexibility – WireGuard supports multiple network configurations, making it suitable for various use cases, including remote access, site-to-site connectivity, and virtual private clouds.
- Automatic reconnection – WireGuard can automatically reconnect VPN sessions if the connection drops, ensuring uninterrupted connectivity.
- Lower power consumption – WireGuard is designed to be more power-efficient than other VPN protocols, making it ideal for use on mobile devices.
# Prerequisites
For you to follow along with this tutorial, you will need:
-
- One Debian 11 server setup with a sudo user and a firewall enabled (I personally use iptables but feel free to use other firewall utilities such as ufw or firewalld). To see how to setup a Debian server, you can follow my How To Setup Debian 11 Server tutorial. This server will be referred to as WireGuard server throughout this tutorial.
- A computing system acting as a client machine which you will use to connect to your WireGuard server. It will be referred to as WireGuard Peer in this guide. Your WireGuard Peer can either be your local machine, a remote server from Contabo for instance, or even a mobile phone if that’s the way you prefer.
For this tutorial, I will use a VPS Debian server setup on Contabo (My favorite VPS server provider).
# Step 1 – Installing WireGuard on Your Debian 11 Server
We will start this tutorial off with installing the WireGuard package on our Debian server. Let’s first update our Debian server’s package index and then install WireGuard by entering the following commands. If you are prompted to enter your password, enter your sudo user’s password:
sudo apt update
sudo apt install wireguard wireguard-tools
# Step 2 – Generating Private/Public Key Pair
Once WireGuard has been installed successfully on our server, our next step will be to create a private and public keypair for our server. In order to achieve that, we will use the built-in utilities wg genkey and wg pubkey to create our keys. Once created, we will add these to the WireGuard server’s configuration file.
We will also have to modify the permissions on the created key files by using the chmod command, since those files will have read permissions to any user on the system by default.
Enter the following commands to create your WireGuard server’s private key and set the proper permissions:
wg genkey | sudo tee /etc/wireguard/server-private.key
sudo chmod go= /etc/wireguard/server-private.key
Notice how we used the chmod command with go= to remove any permissions for the group and other users which ensures only root will have permissions on the private key file.
The output will look as follow:
This is your WireGuard VPN server’s private key, which is now also stored in /etc/wireguard/server-private.key (thanks to the tee command). Make sure you write down the private key output since we will need it later when setting up the WireGuard server configuration file.
To create the corresponding public key, which is derived from the private key, we will enter the following command:
sudo cat /etc/wireguard/server-private.key | wg pubkey | \
sudo tee /etc/wireguard/server-public.key
The output you will get from this command is your public key, which you should also copy and keep close by for the next steps in this tutorial. The public key can also be found in /etc/wireguard/server-public.key file in case you didn’t write it down! Here is the output:
The public key will be needed to setup any peer that needs to connect to the server, which we will talk about further in this guide.
# Step 3 – Defining The IPv4 Range
In the preceding steps, we covered the WireGuard installation process, including the generation of a key pair for secure traffic transmission to and from the server. In this section and further down, we will define private IPv4 addresses to be used with both the WireGuard Server and peers, and delve further into the configuration of the server, creating a configuration file, and automating the startup process for WireGuard upon server reboot. To choose our IPv4 addresses range which will be used by our WireGuard server and clients for creating a VPN tunnel, we can use the following IP address blocks that are reserved for private networks:-
- 10.0.0.0 to 10.255.255.255 (Class A)
- 172.16.0.0 to 172.31.255.255 (Class B)
- 192.168.0.0 to 192.168.255.255 (Class C)
-
- Use a subnet calculator to determine the appropriate IP address range for your network.
- Avoid using IP addresses that are already in use by other hosts on your network.
- Use a consistent naming convention for your hosts and IP addresses to make them easier to manage.
# Step 4 – Setting Up The WireGuard Server Configuration
In order to setup our WireGuard server’s configuration, we will require the following information:
-
- Our WireGuard server’s private key which we created at Step 2 – Generating Private/Public Key Pair
- The IP address you chose for the server as explained in Step 3 – Defining the IPv4 Range.
When those elements are gathered, we can finally create a new configuration file by using vim (text editor), or any editor of your choice with the following command:
sudo vim /etc/wireguard/wg0.confWe can now enter the following lines in this file, while making sure you replace the PrivateKey value with your own server’s private key. In vim, press “i” on your keyboard to enter “Insert mode” and start typing your text, or copying it from below by substituting with your own values:
[Interface]
PrivateKey = uM4RVCS9fRI4D+jm5Uv74+ty/4KIHFz3xMkQVQWuymU=
Address = 10.100.0.1/24
ListenPort = 51820
sudo chmod 600 -R /etc/wireguard/
This way, only root will have permissions on those files which is a better security practice since our private key is in clear text. Our initial WireGuard VPN configuration is now ready and we can continue to our next step.
# Step 5 – Modifying The Network Configuration Of The WireGuard Server
Since we want to route all WireGuard Peer’s Internet traffic to our VPN server, we will now setup IP forwarding on the WireGuard server.
To enable IP forwarding on a Linux system, we will open /etc/sysctl.conf file with vim, but you can also use your favorite text editor like nano if you wish:
sudo vi /etc/sysctl.conf
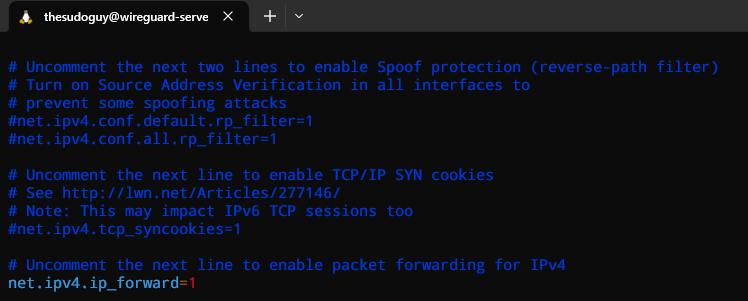
Simply uncomment the following line by removing the # sign on the left-hand side and save the file:
If the line doesn’t exist yet in your file, insert it manually at the bottom of the file → net.ipv4.ip_forward=1. Once you saved and closed the file, we can enter the following command to read and load the new values from it:
sudo sysctl -pYou will get the following output:
From now on, our WireGuard Server will have the ability to forward incoming traffic from the VPN ethernet interface to others on the server (for example eth0), which will then be forwarded further to the Internet. By using this type of configuration, we will allow our WireGuard Peer to route all web traffic through our WireGuard server’s IP address, which will result in hiding our client’s public IP address.
Before we can route web traffic via our VPN server, we will need to setup several firewall rules using iptables, a Linux utility that allows us to configure IP packet filtering rules of the Linux kernel firewall. This way, we can ensure that all traffic between our WireGuard Server and Peers will function correctly.
# Step 6 – Setting Up The Firewall For The WireGuard Server
As mentioned above, we will have to add firewall rules on our WireGuard’s server to make sure traffic is routed between server and clients properly.
In order to allow WireGuard VPN traffic via our server’s firewall, we will use a method called masquerading, which is the process of translating IP addresses in a covered-up way to correctly route client connections, better known as Network Address Translation (NAT). This way, the source IP of our WireGuard client will be replaced and hidden by the IP of the WireGuard server.
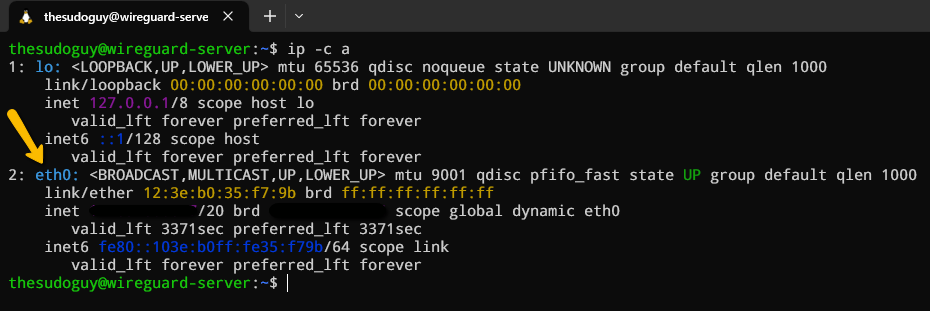
Let’s first start by finding the name of our server’s main network interface as follow:
ip -c asudo iptables -t nat -A POSTROUTING -s 10.100.0.0/24 -o eth0 -j MASQUERADESince iptables is case-sensitive, make sure you enter the commands correctly by using caps where needed! Moreover, let’s not forget to allow SSH traffic to our server if you did not do it yet during server initial setup:
sudo iptables -A INPUT -p tcp --dport 22 -j ACCEPTNow we can add the required firewall rules to our WireGuard Server by entering the following commands:
sudo iptables -A INPUT -p udp --dport 51820 -j ACCEPT
sudo iptables -A INPUT -s 10.100.0.0/24 -p udp --dport 53 -j ACCEPT
sudo iptables -A INPUT -j DROP
sudo iptables -A FORWARD -i wg0 -o eth0 -j ACCEPT
sudo iptables -A FORWARD -i eth0 -o wg0 -j ACCEPT
sudo iptables -A FORWARD -j DROP
-
- iptables -A INPUT -p udp –dport 51820 -j ACCEPT – This rule opens UDP port 51820 to allow WireGuard Peer connections to our server.
- iptables -A INPUT -s 10.100.0.0/24 -p udp –dport 53 -j ACCEPT – With this rule, we tell our firewall to accept DNS requests initiated by our WireGuard peers that are part of the 10.100.0.0/24 network, since we will setup our clients to send DNS requests to the VPN server in a further step.
- iptables -A INPUT -j DROP – This rule will then drop any packages that do not meet previous criterias in the iptables INPUT chain. Therefore, make sure you have allowed SSH access before adding that rule or you will be locked out of your server!
- iptables -A FORWARD -i wg0 -o eth0 -j ACCEPT – This rule will allow our peer’s traffic to be forwarded from our WireGuard interface wg0 to the Internet via eth0.
- iptables -A FORWARD -i eth0 -o wg0 -j ACCEPT – Vice versa, when traffic from the Internet on eth0 is going back to our WireGuard’s peer on wg0, we need to allow it with this rule.
- iptables -A FORWARD -j DROP – Lastly, we drop all traffic that does not meet the above criterias.
sudo apt install iptables-persistentThen save the rules as follow:
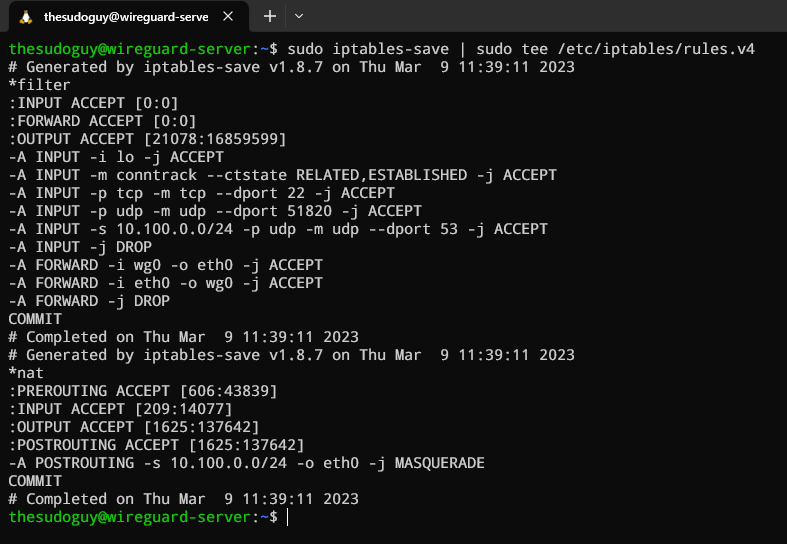
sudo iptables-save | sudo tee /etc/iptables/rules.v4This should get you the following output:
At this point, our WireGuard Server is now properly configured to receive and handle VPN traffic. Thanks to our firewall rules, we can now start the WireGuard service to accept peer connections.
# Step 7 – Installing a DNS Resolver on WireGuard Server
Since we will set the VPN server as the client’s DNS server, the VPN server must be running a DNS resolver. Therefore, let’s install the bind9 DNS server package:
sudo apt install bind9BIND will automatically start after installation is complete and will also be enabled at boot by default. We can check its status with:
systemctl status bind9Let’s look at the output:
● named.service - BIND Domain Name Server
Loaded: loaded (/lib/systemd/system/named.service; enabled; vendor preset: enabled)
Active: active (running) since Fri 2023-04-28 14:50:56 UTC; 24min ago
Docs: man:named(8)
Main PID: 545 (named)
Tasks: 5 (limit: 1146)
Memory: 16.4M
CPU: 46ms
CGroup: /system.slice/named.service
└─545 /usr/sbin/named -f -u bind -4
Once we confirmed that BIND is running and is enabled at boot, let’s go ahead and edit its configuration:
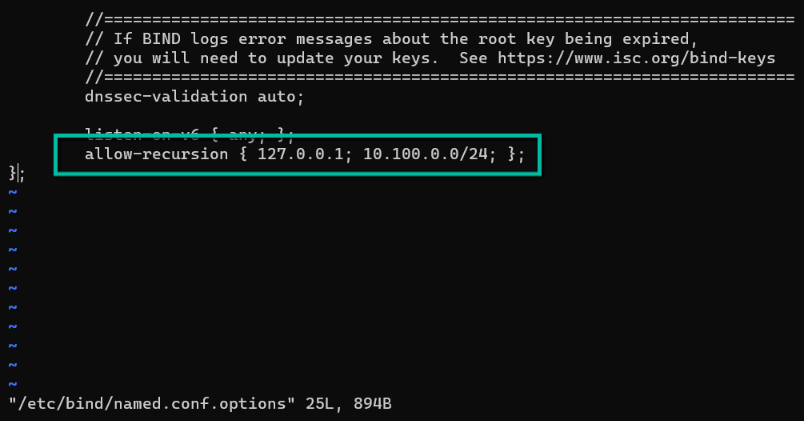
sudo vi /etc/bind/named.conf.optionsLet’s then add the following parameter in this file to allow VPN clients to send recursive DNS queries:
allow-recursion { 127.0.0.1; 10.10.10.0/24; };It should look like this:
We can now save and close this file and edit /etc/default/named file, which is used to define BIND configuration options. We will add the following line at the bottom of the file:
OPTIONS="-u bind -4"
With these paramters, we define the user under which the BIND service should run which is bind and we force the BIND service to listen to IPv4 addresses only. Once again, we save and close the file.
BIND enables DNSSEC by default, ensuring that DNS replies are accurate and unaltered. However, due to trust anchor rollover and other factors, it might not function right away. The managed key database can be rebuilt using the following commands to make it function correctly.
sudo rndc managed-keys destroy
sudo rdnc reconfig
Now we need to restart the bind service to make sure those changes are reflected.
sudo systemctl restart bind9# Step 8 – Launching The WireGuard Server
WireGuard has a built-in wg-quick script that allows us to run our VPN server as a systemd service. This is a better option to setting up a VPN tunnel manually every time, since it is less error prone and easier to run. Therefore, we can use systemctl in order to manage our tunnels, by using the wg-quick script.
Even better, using a systemd service allows us to start WireGuard at boot time so we can connect to our VPN server as long as the server itself is running. Let’s enable the wg-quick service for the tunnel we created in /etc/wireguard/wg0.conf using systemctl:
sudo systemctl enable wg-quick@wg0.serviceNow let’s start the service:
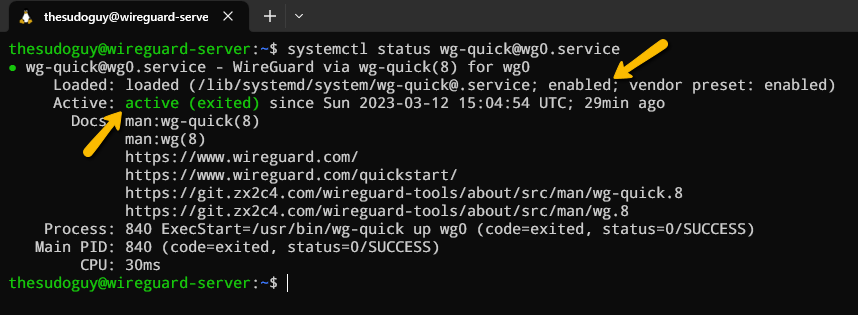
sudo systemctl start wg-quick@wg0.serviceWe can then verify that the service is active with this command:
systemctl status wg-quick@wg0.serviceThe output should show us that the service is active and enabled:
Now that our WireGuard server is running, we can create our WireGuard Peer’s configuration and finally connect to the server. Exciting right?
# Step 9 – Setting up a WireGuard Peer’s Configuration
Our WireGuard Peer’s configuration is going to be similar to our server. We will need to install the software package, generate a public and private key pair, choose which IP address will be used for the peer and setup its configuration. Then, we will be able to start the tunnel, also by using the wg-quick script.
We can add an unlimited number of peers, as long as our server can handle all connections depending on its resources. Make sure however to keep track of all peer’s private IP addresses to avoid collisions.
Let’s now configure our first WireGuard Peer by installing the WireGuard package using the apt command, since we are installing it on a Linux client in this tutorial. Run the following commands to update the packages index and install WireGuard:
sudo apt update
sudo apt install wireguardsudo apt install openresolv# WireGuard’s Peer Key Pair Creation
Using the same procedures as on the server, we must now generate the key pair on the peer. Let’s create the peer’s private and public key using the following commands from our local computer or a remote server that will act as the peer:
wg genkey | sudo tee /etc/wireguard/client-private.key | wg pubkey | \
sudo tee /etc/wireguard/client-public.key
# WireGuard’s Peer Configuration File Creation
-
- Address: Enter the VPN client’s private IP address.
- DNS: Enter the VPN server’s 10.100.0.1 address as the DNS server. The resolvconf command will be used to configure it. For redundancy, you can optionally provide additional DNS servers as follows: DNS = 10.100.0.1 8.8.8.8
- PrivateKey: The client’s private key, which is stored on the client computer in the file /etc/wireguard/client-private.key.
- PublicKey: The server’s public key, which is stored on the server in the file /etc/wireguard/server-public.key.
- AllowedIPs: 0.0.0.0/0 refers to the entire Internet, hence all Internet traffic must go through our VPN server.
- Endpoint: The VPN server’s public IP address and port. Substitute 11.22.33.44 with the actual public IP address of your VPN server.
- PersistentKeepalive: To maintain the connection, send an authorized empty packet to the peer every 25 seconds. The VPN server might not be able to ping the VPN server if PersistentKeepalive is not enabled.
sudo vi /etc/wireguard/wg-client0.confNow let’s insert the following lines in the file (you can copy them and substitute the required data accordingly):
[Interface]
Address = 10.100.0.2/24
DNS = 10.100.0.1
PrivateKey = 2Ayu/cVBUc2WeKyJNMMT0pv0Vc5OgO7xVjwGGYbOXEo=

[Peer]
PublicKey = mxV+XMNC+J4TBIUOMDzLdYzTlOxz9cSTc+XT1v1TCQw=
AllowedIPs = 0.0.0.0/0
Endpoint = 11.22.33.44:51820
PersistentKeepalive = 25
sudo chmod 600 -R /etc/wireguard# Step 10 – Adding Peers to WireGuard Server Configuration
One of the last steps before we can connect our peer to the server, which is the whole point of this tutorial, is to add the peer’s public key and IP address to the WireGuard server. If you didn’t write down or copy the VPN client’s public key, you can enter the follwowing on the peer’s computer to output the public key:
sudo cat /etc/wireguard/client-public.keyOutput:
oEw2LSSYZrXaRh1EmbuDBUpIHvXvBBKBQxmuKPIgEFs=Great let’s copy that value and log into our WireGuard server. Open the file /etc/wireguard/wg0.conf and add the following lines in it (Green text), right under the existing configuration we already added earlier (Written in white):
[Interface]
PrivateKey = uM4RVCS9fRI4D+jm5Uv74+ty/4KIHFz3xMkQVQWuymU=
Address = 10.100.0.1/24
ListenPort = 51820

[Peer]
PublicKey = oEw2LSSYZrXaRh1EmbuDBUpIHvXvBBKBQxmuKPIgEFs=
AllowedIPs = 10.100.0.2/32
Awesome we can now save and close the file and finally go to the final step which is what this tutorial is all about!
# Step 11 – Starting the WireGuard Tunnel on the Peer
The moment we’ve all been waiting for has finally come!
Now that our server and peer are both configured, let’s connect the peer to the VPN tunnel for the first time. In our case, we will use the wg-quick command to activate the VPN tunnel manually on the peer.
To start WireGuard on the VPN client, we will enter the following command.
sudo systemctl start wg-quick@wg-client0Now let’s make sure WireGuard gets started automatically at boot time on the VPN client (if that’s the desired behaviour of course).
sudo systemctl enable wg-quick@wg-client0Let’s quickly make sure that the service is running and enabled.
sudo systemctl status wg-quick@wg-client0● wg-quick@wg-client0.service - WireGuard via wg-quick(8) for wg/client0
Loaded: loaded (/lib/systemd/system/wg-quick@.service; enabled; vendor preset: enabled)
Active: active (exited) since Thu 2023-06-22 00:09:27 CEST; 3s ago
Docs: man:wg-quick(8)
man:wg(8)
https://www.wireguard.com/
https://www.wireguard.com/quickstart/
https://git.zx2c4.com/wireguard-tools/about/src/man/wg-quick.8
https://git.zx2c4.com/wireguard-tools/about/src/man/wg.8
Process: 81058 ExecStart=/usr/bin/wg-quick up wg-client0 (code=exited, status=0/SUCCESS)
Main PID: 81058 (code=exited, status=0/SUCCESS)
CPU: 88ms
Visit the following link to check your public IP address: https://icanhazip.com/. If everything went according to plan, the public IP address of your VPN server rather than that of your client machine should be displayed.
If that’s the case, congratulations! You just setup your own WireGuard VPN server and are now browsing the web with more privacy and security. If not, keep reading for some troubleshooting instructions.
# Troubleshooting Instructions
If you need to read those instructions, it’s probably because you are having trouble making this whole thing work. Most of the time, it is simply due to a misconfiguration such as you forgot a semi-colon in a configuration file or maybe the firewall that is not allowing the WireGuard port for instance. Let’s take a look at some common issues with WireGuard VPN and how to fix it.
# Unable to browse the Internet
Let’s say your VPN tunnel has been established successfully but you are not able to browse the Internet. Moreover, your IP address is still your VPN client’s public IP address instead of the server’s IP address. This is probably because the masquerading firewall rule is not set properly. Read Step 6 – Setting Up The Firewall For The WireGuard Server and make sure to add the firewall rule properly. By the way, if you need to delete a firewall rule, look at your current firewall rules first and display their numbers as follow:
sudo iptables -L --line-numbersThe –line-numbers option will display the rule number for each firewall rule that are setup. The output will look like this:
Now in our case, we need to check the masquerading rule so we need to add another parameter to our command in order to display the nat table rules:
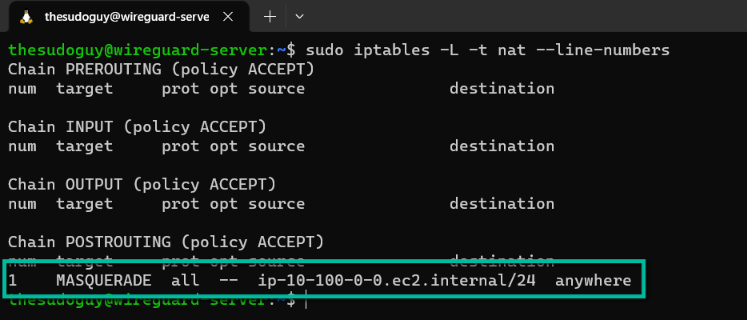
sudo iptables -L -t nat --line-numbersYour output should look like this:
In this case, we only have one rule in the POSTROUTING chain of the nat table. Since this is rule number one, we can then delete it as follow:
sudo iptables -t nat -D POSTROUTING 1If you do not get any error message, it means that the masquerading rule has been deleted successfully. We can now add it again as mentioned above.
# Error messages when pinging
To test if your VPN tunnel is working properly, you can try to ping one of the VPN clients (for example ping 10.100.0.2). If you get the following error message while pinging, you should make sure your AllowedIPs parameter is correct and matches the VPN client’s IP from the tunnel.ping: sendmsg: Required key not availableAnother error message you could receive when trying to ping is:
ping: sendmsg: Destination address requiredIf that’s the case, make sure your private/public key are correctly set in the configuration files.
# Conclusion
In this lesson, we learned how to set up both the server and client systems with the WireGuard package and tools. On the server, we used the sysctl command to adjust kernel settings to allow packet forwarding and set up firewall rules for WireGuard. In addition to learning how to create private and public WireGuard encryption keys, you also learned how to set up the server and a peer (or peers) to communicate with one another. I hope you enjoyed it and don’t forget to leave a comment!




0 Comments